

What Nails To Use On Fiber Cement Siding?
How to Install Fiber Cement Siding
Updated: Jul. 14, 2021
How to cutting, boom and install durable fiber siding, plus caulking and painting tips.
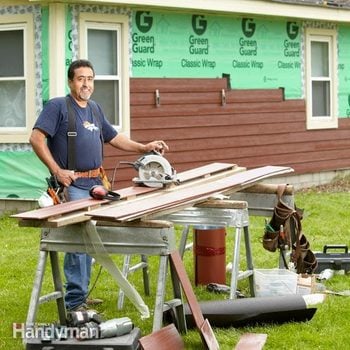
Half the cost of a cobweb cement board siding job is labor, so you tin can salve thousands of dollars past installing it yourself. A siding pro shows the tools and tricks needed for a weathertight installation.
You might also similar: TBD
- Fourth dimension
- Complexity
- Cost
- Multiple Days
- Intermediate
- $501-1000
Cobweb cement is tougher than other materials

Installing fiberboard cement siding
Fiberboard cement siding looks identical to forest once information technology's painted.
When you desire the archetype wait of wood siding coupled with lifetime durability, fiberboard cement siding may well be your best choice. Fiberglass cement siding is a blended made of Portland cement, silica and forest fiber. One time painted, it looks about identical to wood. It'south available in many styles and widths, both shine and forest textured, and yous still go the crisp joints and details that'll make your abode's exterior stand out. In addition, it's highly rot and insect resistant, won't burn down and paints beautifully.
Jaime Venzor has been in the siding business for more than than 15 years. He started out installing mostly vinyl, but now 80 per centum of his work is fiber cement. He earned his skillful reputation with his customers past doing things the correct way, and he earned our thank you by sharing some of his noesis with us. So read on and learn what Jaime thinks are the most of import tips.
Hold the starter one/iv in. downwardly

Create a drip border
Find your virtually trounce-up pieces of siding and rip them downward into 1-i/iv-in. starter strips. These strips, installed at the bottom, will brand your get-go row of siding bending out to lucifer the rest of the rows. Snap a line 1 in. above the bottom of the wall sheathing as a guide. Install these delicate starter strips with a 15-gauge trim gun. Snap another line for the bottom row of siding, positioning it and then it will hang down an additional 1/4 in. from the starter.
Nailing Basics
Fiberboard cement siding can be hand-nailed, but considering it'due south so much harder and more brittle than woods, you take to predrill holes nigh any edge. You can save yourself a bunch of time by using a pneumatic coil siding blast gun. Unfortunately, a siding gun volition set you back twice every bit much as a 15-judge trim gun, and it'due south only half as versatile, and then if installing cobweb cement isn't your full-time gig, yous may want to rent 1 (well-nigh $110 a week). Every manufacturer has specific nailing guidelines, merely hither are some basic rules:
- Use 6d or 8d galvanized or stainless siding nails and install a single nail about 1-in. downward from the top edge at each stud, no more than 16 in. apart. n Boom lengths should be chosen so they penetrate a minimum of 1-1/4 in. into the solid woods (forest sheathings similar OSB and plywood count toward the one-one/4 in., merely "soft" sheathings like fiber board and cream don't).
- Don't drive nails into the siding at an angle.
- Fastener heads should be snugged upwards against the siding, not driven into the surface.
- The end of each plank making up a butt joint needs to exist attached to a stud.
- Boom butt joints last. That way y'all can tweak the ends of each plank so the bottom edges line up perfectly.
Preassemble the corners
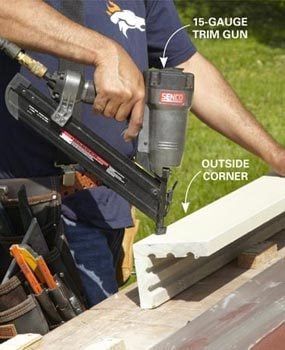
Use a end nailer for trim
It's a lot easier to preassemble corners on a flat surface. Jaime uses 2-one/four-in. galvanized nails in his 15-judge trim gun. He uses the aforementioned size nails to install the corners on the wall. Don't use a framing gun or try to handnail the corners together; that'southward a skilful fashion to interruption the trim boards. As well, the trim nails expect better where nails will be exposed, especially on a prefinished corner board. So, if you don't accept a 15-guess trim gun, what a perfect "opportunity" to get purchase one.
Install fiber cement using a few special techniques
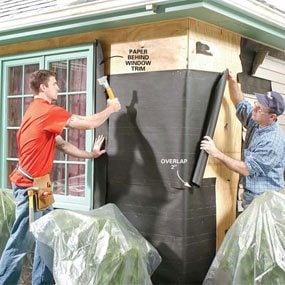
Photo 1: Staple building paper to the sheathing
Mark stud locations at the top and bottom of the wall. Staple building paper to the wall capsule, lapping elevation pieces over bottom pieces by at least ii in. Fit and slide paper behind the window trim.

Photo 2: Nail furring strips at the top of the wall
Snap chalk lines to mark the frieze lath location and nail treated furring strips forth the lines. Keep the bottom strip one/four in. to a higher place the lesser line.

Photo 3: Use a circular saw to cut the frieze lath
Cutting the frieze board to length with a round saw, using a rafter angle square as a cut guide. Truthful upwardly cut ends with a rasp or a sanding block.

Photo four: Predrill holes for easy installation
Predrill and nail the frieze boards, driving two galvanized box nails into each stud. Hold the nails at least 3/iv in. from the edges. Drive the nailheads snug with the surface of the siding. Exercise non overdrive them. Apply caulk at the corner lap joint before installing the second piece.

Photo 5: Nail up the corners boards
Install the corner boards, lapping one over the other with caulk in the articulation. Nail every 16 in. with a pair of 8d galvanized box nails.
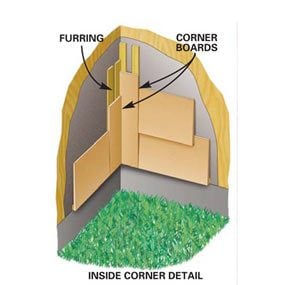
Inside corner detail
Lap inside corners the aforementioned way as exterior corners.
The layout process is exactly the same as for forest siding. Mark the stud locations with a pencil on the soffit and foundation where they won't be covered by the building paper. Install the building paper (Photo i), then follow your stud location marks and snap chalk lines (Photo ii) to guide both your nailing and your placement of siding joints. We're besides using fiber cement trim boards. Since they're only 7/16 in. thick, rip iii/eight-in. thick strips from treated 2-by lumber and apply them to fur out the frieze boards (Photograph ii). At present they'll sit well-nigh 1/viii in. above the lap siding.
Cut the frieze board to length (Photo 3). Fiberboard cement siding is highly abrasive. Fifty-fifty a carbide molar blade will terminal for simply part of the day. At home centers, you lot can buy diamond blades made specifically for cutting fiber cement. These blades cut quickly and create less grit. But nosotros had success with a less expensive dry-cut, diamond masonry blade. Drill cutouts for electrical boxes and pipes with regular twist $.25 or spade $.25, and brand interior or fifty-fifty curved cuts with a jigsaw fitted with a tungsten or carbide grit bract (these blades are available at home centers and tile stores). Cutting fiberglass cement siding raises a lot of silica dust, so work outside and wear a dust mask.
Blast up the frieze board by drilling 1/8-in. pilot holes and driving two galvanized box nails at each stud (Photograph 4). Your nail length may vary from ours depending on the type of exterior sheathing used on your home. In general, use nails that penetrate the studs at to the lowest degree 1 in. Drive the nailheads snug against the fiber cement board. If driven too deep, the heads volition crush the fiber cement lath and reduce the smash's holding power. Don't boom cobweb cement corners together (Photo 4). A nail driven into the edge of a fiber cement board will dissever it.
Next make the outside corner (Photo five), following the same steps as for the frieze boards. Be sure the bottoms of the corner boards cover about 1/2 in. of the foundation.
Tip:
If you don't have access to a table saw, buy a sheet of 1/ii-in.treated plywood and rip furring strips with a circular saw.
Caution!
Cut outdoors, clothing a dust mask to avoid breathing the grit, and keep others away.
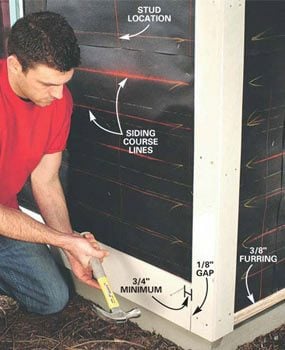
Layout the siding courses

Photo vi: Marker the siding grade locations
Mark the top of each siding course using the story pole equally a guide (see "Making a Story Pole."). Then snap chalk lines to keep each class straight.
Photograph 7: Install the start course of siding
Nail a 3/8-in. treated starter strip along the lesser of the wall. Then cut and smash the first grade of siding forth the layout line. Go out a i/8-in. gap at the finish, and boom at each stud with a unmarried 8d galvanized box nail held 1 in. downwardly from the summit border.
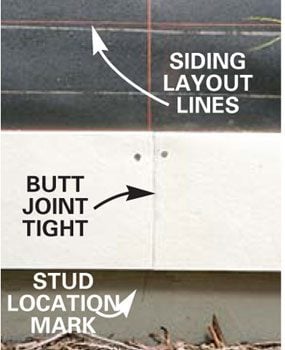
Butt articulation particular
Butt the siding courses tight together.
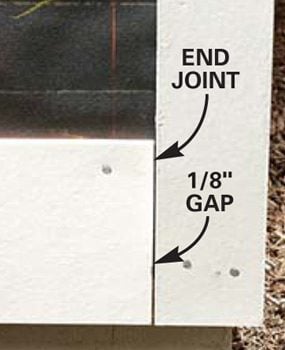
Terminate articulation item
Exit a small gap between the siding and the corner trim.
With the trim boards completed, lay out the siding courses with a story pole. (See "Making a Story Pole.") Hold the top of the story pole snug against the frieze lath and mark out the siding courses (Photo vi) at all corners and effectually windows and doors. Following these layout marks, snap horizontal chalk lines. Remember that these layout lines represent the superlative of each siding form.
Rip and boom up a iii/8-in. thick treated forest starter strip along the bottom of the wall (higher up the foundation). This strip volition tip the kickoff slice of siding to the proper angle. Mensurate and cut to length the first slice of siding and nail it in place (Photo 7).
Go out a ane/8-in. gap where the end meets the corner board (Photograph vii, inset) and make sure the other end lands on a stud line. Install the next piece then its cease butts lightly against the first (Photo vii, inset). Go along with the siding courses, aligning the top edges to the layout chalk lines. Be certain to stagger the butt joints so they don't prevarication on top of each other every bit yous piece of work your manner up.
Tip:
Pros utilize pneumatic coil nailers (you can rent i) designed specifically for fiberboard cement siding. They cut nailing fourth dimension in half. If you go this route, practise first to brand sure the nailheads will exist set flush.
Making a Story Pole
Cut a straight 1×2 so its length runs from the frieze board to the bottom of the first siding class. Measure upward from the bottom of the story pole to mark the total width of the first course of siding. Remember, this marker represents the top of the siding piece, not the bottom of the second course.
From this point, make marks upwards the pole at the recommended exposure for your siding. The elevation course should be at least 2-thirds the width of the lower courses. Check your layout marks against window and door openings and other features around the house, and adjust the exposure to avoid having to rip narrow pieces.
When the final layout is OK, draw heavy lines on the face and both edges of the story pole using a foursquare. Now agree the story pole tight confronting the frieze board at all corners and alongside windows and doors. Transfer the layout marks to the wall and snap chalk lines. This will ensure that all the siding courses get on straight and uniformly.
Remove the plastic concluding
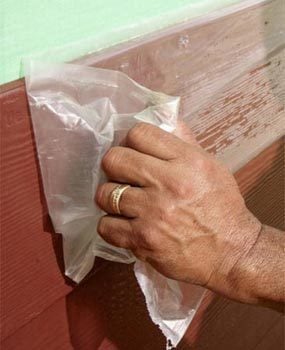
Protect prefinished fiber cement lath
Prefinished fiberglass cement siding boards come with a protective plastic blanket. To protect the pigment from getting scratched during installation, leave the plastic on and make your cuts right through information technology. Peel away the plastic afterward the board has been fastened to the wall.
Flash the butt joints
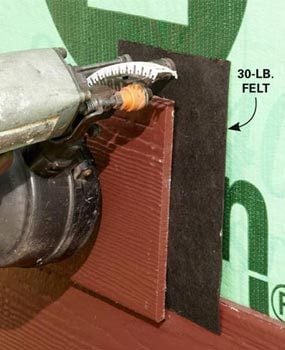
Keep water out
Caulking butt joints is unnecessary, and some manufacturers prohibit it. Withal, you should flash behind the joints. You can use metallic, house wrap or any other canonical WRB (weather-resistant barrier), simply Jaime prefers to use 30-lb. felt paper. It's easy to work with and inexpensive, and it isn't noticeable if a seam happens to open upwardly a little. Tack it to the wall so it doesn't become knocked out of identify when yous install the second piece of siding.
Spacing for Cobweb Cement Board Joints
Fiber cement boards don't aggrandize and contract much, just go out a little room for expansion at the end joints and so fill the gap with caulk. Butt joints, however, should exist nailed tightly together and should not be caulked. Make sure all butt joints are on studs, and stagger the butt joints every bit you work your mode up the wall.
Windows need drip cap and a gap on acme
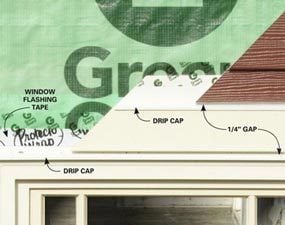
Window and door detail
Whether or not you're installing trim boards around your windows, yous'll demand to install a baste cap over the window. You'll too demand to leave a one/4-in. gap (no caulking) between the pinnacle of the window and the plank or trim lath directly in a higher place it. This is to permit whatever water that may have gotten behind the siding to weep out. Tape the baste cap to the wall, but don't tape all the way to the lesser of the baste cap because it volition be visible through the ane/4-in. gap. The top trim lath will also need its own drip cap and 1/4-in. gap. Care for the tops of doors the same mode.
It's a two-man job without siding gauges

Siding gauges concord boards
Fiberboard cement siding is heavy and breaks if it's bent also much. Installing this stuff by yourself is tough, but information technology'south possible with the aid of siding gauges. These tools not simply create the proper reveal (the part of the siding that shows) betwixt rows but also actually agree the planks in place while yous nail. Even if yous do merely one fiber cement job, siding gauges are worth the coin.
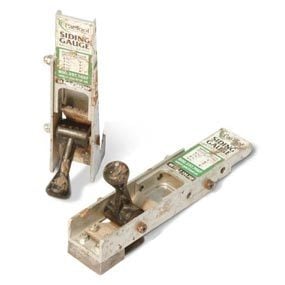
Gecko siding gauges
A pair of the SA902 Gecko Gauges shown hither costs about $ninety (available though our affiliation with amazon.com), but cheaper versions are bachelor. Most gauges are adjustable to adjust reveals from v to 8 in.
Painted vs. Primed
Nosotros decided to use a prefinished product in this story, but the other manner to become is simple primed siding. That material is primed and fix for you to paint. Hither are some facts to consider when making your decision.
The advantages of primed: Primed products cost 50 per centum less than prefinished products. On-site painting looks better upward shut because the touch-up paint and caulked areas aren't as noticeable. Primed products are easier and less expensive to install.
The advantages of prefinished: The color on a prefinished production won't fade virtually equally fast. Some finishes come up with a 15-year warranty. But the best role of using a prefinished product is that after installation, you're washed and not faced with painting an entire firm.
Cut cobweb cement boards with a round saw

Dust mask is essential
When yous're cutting this stuff, a dust mask is the bare minimum protection, and this is not a casual warning: The silica grit generated by cutting fiber cement can be bad news for your health!

Cobweb cement board saw blade
You can purchase fiber cement blades sized to fit any saw way or size at most dwelling house centers.
Tons of fiber cement cut gadgets are available, just nigh jobs can be handled with just a steady eye and a standard round saw fitted with a cobweb cement blade. If you programme to hang a lot of fiber cement, though, you'll want a chop saw with a proper bract that volition allow you to cutting several pieces at once.
Vinyl mounting blocks work best

Lights, receptacles and vents
Nigh fiber cement manufacturers make mounting blocks for lights, electrical receptacles, A/C lines, PVC venting, etc. Jaime prefers to employ the vinyl mounting blocks typically used with vinyl siding. They're cheaper and piece of cake to install, and you tin cutting the proper-size pigsty in a plastic mounting block with a utility pocketknife or a snips. With fiber cement blocks, you lot accept to use a jigsaw or a hole saw.
MountMaster is one make of blocks sold at Lowe's and many lumberyards. It's bachelor in more than 25 colors, but y'all can order paintable blocks if you want an exact match with your siding or trim.
Paint, prime or caulk all cut edges
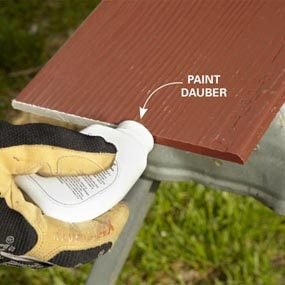
Butt joint
Paint cut edges at butt joints.

Cease joint
Caulk edges that butt against corners and trim.
Every time y'all cut a plank, you create an exposed surface that has no primer or paint to protect it from the elements. If a cut edge is going to barrel upward against a corner mail or trim board, it gets caulked. If the cutting edge is part of a barrel joint in the centre of the wall, it needs to exist painted (try to use factory edges on all barrel joints). Planks that have been cutting to fit over windows and doors also need pigment. Lodge paint kits and caulking to match both the trim and the siding colors. Your siding supplier should have admission to both.
The Lowdown on Clearances
Fiberboard cement siding is not bulletproof—it will deteriorate if exposed to water for a long time. It'southward imperative that you honor the proper spacing between the siding and the roof surfaces and between the siding and the horizontal surfaces, such as the ground or cement slabs and decks. Cheque with your specific manufacturer before yous commencement. Here are some general guidelines.
Leave:
- 1/8 in. to 1/four in. between siding and trim
- 1/four in. between siding and horizontal flashing
- one in. between the gutter and an adjacent wall
- 2 in. between siding and roofing, decks, patios, driveways, steps and walkways (using PVC trim boards is a practiced way to attain these clearances)
- 6 in. between the siding and the basis.
Don't skip the kick-out flashing
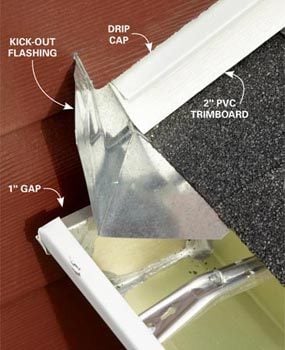
Kick-out flashing
Kick-out flashing is essential for preventing water from running downward a roof and behind the siding on an side by side wall. Yous'll neglect your inspection if the inspector doesn't see it on your job. It's a hurting to piece of work around, merely it helps if you don't nail the flashing tight until you lot accept your siding cut to size. It's much easier to get a proper fit for a plank if y'all can shift the flashing beneath information technology.
Cutting fiber cement lath around openings
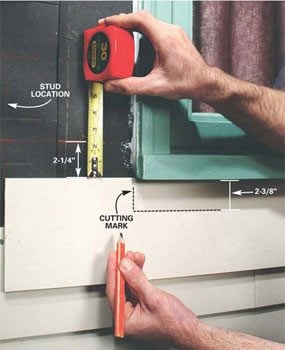
Mark the siding to fit effectually windows
Agree the siding snug nether the windowsill and mark the window border location. Then measure from the chalk line to the top of the siding. Add 1/8 in. to your measurement. This is the width of the cutout.

Install the notched siding under the window
Cut out the notch with your saw and slide the slice into place, leaving a 1/8-in. gap between the siding and windowsill. Caulk this gap after. Predrill and nail at each stud, including under the window.
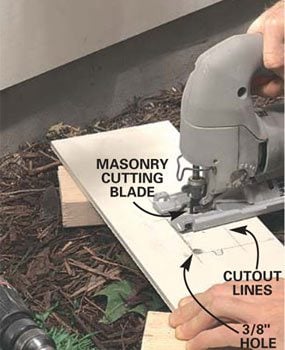
Make cutouts with a jigsaw
Drill a 3/8-in. hole at the corner with a standard twist drill bit. Cut forth the line with a jigsaw fitted with a carbide grit bract. So nail upwardly the piece of siding.
Notch to become around windows and doors. Exist sure to allow a one/8-in. gap where the siding meets the window trim and sill. This joint will be caulked later. Nail the summit border of the siding forth the windowsill at each stud. These nailheads will be exposed, merely the paint will encompass them.
Notch to become around windows
Photograph 8: Mark the siding to fit nether windows
Hold the siding snug under the windowsill and mark the window edge location. So measure out from the chalk line to the summit of the siding. Add 1/eight in. to your measurement. This is the width of the cutout.
Photo 9: Install the notched siding under the window
Cutting out the notch with your saw and slide the piece into identify, leaving a ane/viii-in. gap betwixt the siding and windowsill. Caulk this gap later. Predrill and nail at each stud, including under the window.
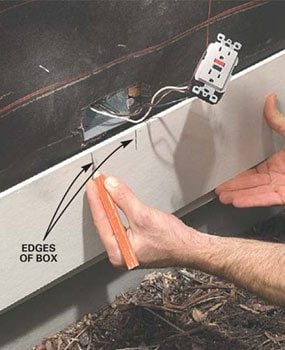
Photo x: Mark cutouts in the siding
Hold siding in place nether wall penetrations such as this electrical box. Marking the width and height of the cutout. Caution: Turn off the power to the receptacle before removing it from the box.
Photo 11: Make the cutout with a jigaw
Drill a iii/8-in. hole at the corner with a standard twist drill flake. Cutting along the line with a jigsaw fitted with a carbide grit blade. Then nail up the piece of siding.

Photo 12: Cutting and install the top course of siding
Cutting the top course of siding to width and nail at each stud. Go out a i/8-in. gap at the top edge. Fill all i/8-in. gaps with acrylic latex caulk.
Notch to go around windows and doors (Photos 8 and ix). Exist sure to allow a one/viii-in. gap where the siding meets the window trim and sill. This joint volition be caulked later on. Nail the meridian edge of the siding forth the windowsill at each stud. These nailheads will be exposed, but the pigment will cover them.
H2o intrusion around wall penetrations can be a problem for any type of siding. Lay out and make the cutout for the electric box (Photos 10 and 11). The electrical box cover is gasketed to seal out water. For pipes, electrical entries and similar fixtures, fit the siding every bit tightly as possible and then seal with a polyurethane caulk or non-hardening electrician's putty. Rip the pinnacle grade of siding to width and nail it up (Photo 12). Hold these nails 1 in. below the top edge. Once more, these nailheads will be exposed.
Buy the siding already primed. If you prime it yourself, apply an alkali resistant primer. Caulk all the joints with an acrylic latex caulk before applying the concluding coats of pigment. Exist certain the caulk fills the 1/viii-in. joint completely to keep it watertight. Cease-coat with a 100 pct acrylic latex paint.
Tip:
If you live in a region of high rainfall or the wall is highly exposed to water, slip a iii-in. broad strip of building newspaper backside barrel joints. Be sure the bottom edge of the newspaper laps on superlative of the lower grade of siding.
Required Tools for this Project
Take the necessary tools for this DIY project lined upwards before you lot start—you lot'll save fourth dimension and frustration.
Y'all'll also need siding gauges, a fiber cement circular saw blade, a siding nailer and a xv gauge trim nailer.
Required Materials for this Project
Avoid concluding-minute shopping trips by having all your materials prepare ahead of time. Here's a listing.
Originally Published: February 20, 2018
Source: https://www.familyhandyman.com/project/how-to-install-fiber-cement-siding/#:~:text=Use%206d%20or%208d%20galvanized,apart.
Posted by: brannanuncy1967.blogspot.com
0 Response to "What Nails To Use On Fiber Cement Siding?"
Post a Comment